FIFA 23 CUSTOM TACTICS

FIFA 23 Custom Tactics are responsible for making your team play the way you want.
FIFA 23 Custom Tactics

Custom Tactics for FUT


Ultimate Team is all about creating the team of your dreams. However, you are wrong if you think the job stops once you buy all the players you want. FUT goes much beyond that. It would be best if you customised your club to make it unique and fine up everything so that your players play as a team. That’s where formations, tactics and instructions play an important role.

Custom Tactics allows you to adjust the way your team plays. They have a big impact on your play style. Unlike what happens with instructions, these orders will not affect only one player but the whole team.

These are the FIFA 23 custom tactics in the Ultimate Team game mode:

  • Defensive
    • Defensive Styles
    • Defensive Width
    • Depth
  • Attacking
    • Build Up Play
    • Chance Creation
    • Offensive Width
    • Players in Box
    • Corners
    • Free Kicks

Creating a new Tactic


Now that you know each tactic, it’s time to learn how to set them up.

How to set up new FIFA 23 custom tactics?
  1. From the main Ultimate Team screen, press R1/RB to select the [Club] tab;
  2. Select [Squad];
  3. Press L2/LT to popup [Squad Actions];
  4. Scroll down to [Custom Tactics];
  5. Make the desired changes and save.
Before starting a match, you can also make changes, selecting Edit Lineup > Squad Actions > Tactics. Even after the game starts, you can pause it and make new adjustments.

To make your job much easier, we strongly recommend you set up game plans with specific custom tactics.

Defensive Styles


It determines how hard the team will tackle and how much pressure is applied to the ball possessor.

Drop Back
This tactic will preserve your team shape and offer your opponents more possession. However, your strikers will stay passive, and you may have fewer attacking options when you win the ball.
Balanced
A balanced style where your team presses the ball to the middle of the pitch and your team’s shape is neutral.
Pressure on Heavy Touch
Your team preserves their shape until the opportunity to pressure appears. Pressure when the opposition takes a heavy touch; it’s a loose ball or controlling a difficult pass facing their own goal.
Press After Possession Loss
After losing possession of the ball, your teammates will press the ball for approximately 7 seconds. Again, this will affect player fatigue, and your players could be out of position if you don’t win it back during this time.
Constant Pressure
This tactic will put high pressure on opposing players on the field. This tactic may leave your team vulnerable as your players become increasingly tired, pushing them out of position.
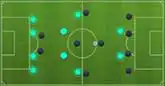
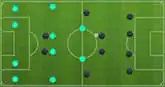
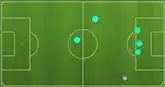
Defensive Width


It affects how much the team will shift to the ball side when defending.

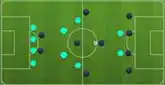
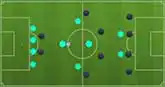
Narrow (Slider: 0-30)
Adjust your defensive team shape to be narrow. Adjust to cover central position to make it harder for your opponent to play through the middle of your team, but you’ll leave more spaces out wide for the opposition wingers. The team will defend compactly. Players will pinch in on the far side to cover teammates and allow for ball side pressure.
Normal (Slider: 30-70)
Adjust your defensive team shape to be balanced. The team will not try to defend particularly narrow or wide. You may find that one-to-one situations are more common when you don’t have the ball.
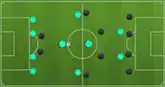
Wide (Slider: 71-100)
Adjust your defensive team shape to be wide to cover the wings, but your team could leave holes in central positions. The team will not pinch as much. Players on the far side will mark opponents tightly, sacrificing cover in favor of making it difficult for the opposition to pull them out of shape.
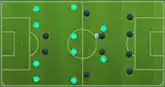
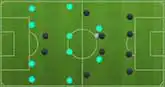
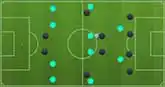
Depth


It determines how high the team will start to pressure the opposition up the pitch.

Deep (Slider: 0-30)
Adjust your defensive team shape to be deep to give less space behind your back line for long balls and fast strikers to make runs behind your team. Playing deep will open more areas for long shots or possession for the opposition team. The team will drop back and allow the opposition team in their own half in exchange for getting numbers behind the ball.
Medium (Slider: 31-70)
Adjust your defensive team shape to be balanced to keep tour team in the middle of the pitch to try to win the midfield battle. The team will start to defend in their opponent’s half but not the full length of the pitch.
High (Slider: 71-100)
Adjust your defensive team shape to be high to help put pressure on possession teams. Your back line will be high and vulnerable for long balls in behind. The team will apply full pressure in their opponent’s half. Wide midfielders and fullbacks will push high on the ball side to make it difficult for the opposition to play out.

Build Up Play


It determines how a team performs when it is in possession in its half. In other words, it’s all about the speed at which the attacking team advances play, the general passing distance and the style of support play from teammates in their half.

Balanced
This tactic is used for a balanced team that maintains its formation. Players will support and make runs when they think it’s the right time to do so. As a result, the team does not build play particularly fast or slow.
Slow Build Up
Players will support more in attacking build-up play rather than a direct approach with many forward runs. This tactic emphasizes a short passing game with a slower build-up.
Long Ball
The team will make runs for long balls played into space behind the opposing back line or up to a target man for a direct attack that skips the midfield. Strikers who are fast with an excellent attacking positioning attribute are the best at this tactic.
Fast Build Up
This tactic pushes players forward for a faster build up, but if you lose possession of the ball, you could find yourself open to a counter attack.

Chance Creation


It determines how a team will attack the opponent in their half and how they will create goals. In other words, it’s all about the speed at which the attacking team advances play, the general passing distance and the style of support play from teammates in the opponent’s half.

Balanced
This tactic is used for a balanced team that maintains its formation while building up the attack. Players will offer support and make runs when they think it’s the right time to do so. As a result, the team does not build play particularly fast or slow.
Possession
Players will support the dribbler more closely in the attacking zone rather than going on forward runs. This tactic strengthens a short passing game to patiently wait for the chance to attack but will rarely provide runs penetrating the opposing defensive line.
Direct Passing
Once the team enters the attacking zone while in possession, players will create chances by making runs for passes into space behind the opposing back line. Strikers who are fast with an excellent attacking positioning Attribute are usually well suited for this tactic.
Forward Runs
This tactic pushes players forward deep into attacking areas, but if you lose possession of the ball, you could find yourself open to a counterattack.
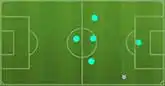
Offensive Width


It affects how much the team will shift to the ball side when attacking.

Narrow (Slider: 0-30)
Adjust your offensive team shape to be narrow to have more players in the middle of the pitch for short passing options. The wings will be open when you lose possession.
Normal (Slider: 31-70)
Adjust your offensive team shape to be balanced for generic positioning to give you more varied attacking options.
Wide (Slider: 71-100)
Adjust your offensive team shape to push your wide players towards the sidelines. You’ll have more passing options wide, but less in the middle of the pitch.
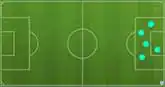
Players in Box


It affects the timing of when players make runs into the box and how many players will look to get into the box to get on the end of a cross.

Low Amount (Slider: 0-3)
When in the crossing zone adjust your team to have less players in the box for a more patient attacking style. Your players will stay outside the box and rarely make forwards runs for crossing situations.
Normal (Slider: 4-6)
When in the crossing zone, you will have some players making runs into penalty area if it’s the right time to make the run.
High Amount (Slider: 7-10)
When in the crossing zone ask your players to make lots of runs into the box. This could be effective to get numbers in the box, but it could leave you vulnerable for a counter attack.

Corners


It affects how many players will position themselves in the box during a corner.

Low Amount (Slider: 1-2)
Have a low amount of players in the opposition’s penalty area during corners for a more defensive approach.
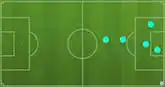
Normal (Slider: 3)
Have a normal amount of players in the opposition’s penalty area during corners.
High Amount (Slider: 4-5)
Have a high amount of players in the opposition’s penalty area during corners for a more offensive approach.

Free Kicks


It affects how many players will position themselves in the box during a free kick.

Low Amount (Slider: 1-2)
Have a low amount of players in the opposition’s penalty area during free kicks for a more defensive approach.
Normal (Slider: 3)
Have a normal amount of players in the opposition’s penalty area during free kicks.
High Amount (Slider: 4-5)
Have a high amount of players in the opposition’s penalty area during free kicks for a more offensive approach.

The Best FIFA 23 Custom Tactics


You will find many players saying they found the best custom tactics possible, but you should know that there is no perfect configuration, so avoid copying it from other players. It doesn’t mean it will work with you because it works with them.

You should always set up custom tactics according to your play style, experience, and squad needs. When you make a decision, you are adding good things to your team but at the expense of something bad. It’s up to you to decide whether or not it’s worth it.

Keeping in mind what we said, you still may want to know what are the most popular FIFA 23 custom tactics. They eventually will not work with you but can be a starting point so you can set up yours appropriately.

Custom tactics may depend on several factors like your play style, squad, instructions, and more, but one of the most important is the formation you use. So if you want to know our custom tactics suggestions based on the formation, visit our formations database.
Frequently Asked Questions
FIFA 23 Tactics allow you to adjust how your team plays, including how your players position themselves on the field.
You should always set up your custom tactics according to your play style and experience and your squad’s needs.
There are no better tactics than others. It all depends on your squad and play style.
If you have never set up your own custom tactics, your team will be using the default values. If you want to change them, please follow these steps:
  1. From the main Ultimate Team screen, press R1/RB to select the [Club] tab;
  2. Select [Squad], [Squad Actions] and then [Custom Tactics];
  3. Make the desired changes and save.
Yes, FIFA 23 custom tactics can be edited on the web and companion app.
Use player instructions to give direct orders to one or more players.
Dynamic Tactics allow you to to create multiple game plans that you can switch between during a match. To set up a game plan, follow these steps:
  1. From the main Ultimate Team screen, press R1/RB to select the [Club] tab;
  2. Select [Squad];
  3. Press L2/LT to popup [Squad Actions];
  4. Scroll down to [Custom Tactics];
  5. Press L2/LT/W and edit one the four-game plans available;
  6. Save the changes.
You can now access the plans in-game with the directional button.
This tactic determines how your team will react to regain possession and how strongly they will chase the opponent. In other words, these FIFA 23 tactics define how often the AI will take control of your defenders.

The player approaches the ball at Drop Back but doesn’t provoke a challenge. He’ll surround the opponent, keep the team in place and respond to offensiveness with retreat or body contact, except when you decide to press tackle right away.

If the slider is at Constant Pressure, the AI will call for other players to chase the one possessing the ball. It is a riskier option, but it does allow you to intercept passes and occupy the parts of the field where you’re exposed manually.
In our opinion, you should only use more risky options if you are losing. On the other hand, if you have good defensive skills, then Drop Back may be very useful when winning.
This tactic determines how far your players stay from each other while defending.

At Narrow, the players will concentrate more in the middle, exposing the flanks more. Fullbacks and wingers will also tend to stay central, preventing the opponent from advancing through there but giving them passage for long runs. Therefore, it is recommended when playing against teams that rely on the midfielders, such as the popular 41212(2).

At Wide, the players will defend widely, leaving the middle exposed but stopping all that comes from the sides. This option is excellent against wider formations.
Except for a few particular cases, the team’s width should be between 20 and 50. After all, everyone who’s played football at least once knows that defending should focus on the center, and attacking can be done widely.

Defenders should always stay close to each other for a solid defense, supported by the midfielders, as most people will tend to advance through the middle. Besides, most defenders have good physicality and defending, which are essential for central players but less critical for the wide ones.

In these cases, the pace counts the most, which is precisely what defenders lack. The fullbacks are particularly useful when your center-backs don’t go out much because they’ll always be between the opponent’s wingers and your goal.

This tactic determines which part of the pitch your players will pressure the opponent. Unlike what is often said, pressure isn’t performed exclusively over the extremes (attacking and defending fields). This setting affects all players in a team.

At Deep, the attackers will hardly get through the midfield, allowing the opponent to advance somewhat easily. It’s more like a restraint strategy, which is great for people who like playing defensively, resulting in a compact midfield.

If the slider is set to High/Front, your first defensive line will pressure whoever possesses the ball, while the second defensive line may perform pressure even beyond the midfield. With this option, the objective is to regain possession as soon as possible and as far from your own goal, keeping the opponent from building his plays efficiently.
In our opinion, it’s best to set the slider between 50 and 60. Less in case you have bad defenders, more in case the opponent keeps passing the ball around your defending field, looking to waste time.
This tactic determines how your team will get the ball out of your defending field and the speed of your players while going forward.

Most players use Balanced, but it doesn’t mean it is the right choice for everyone. Players should adjust the Build Up Play according to their teams and experience.

Unlike many, a slow build-up style doesn’t mean the players are running slower. They’ll use the same speed but sometimes hold their sprint for a bit, which keeps them closer to each other at all times, preventing you from missing many passes. Players tend to get close to the one who possesses the ball, creating shorter and safer passing lanes. In these situations, you have more time to think your actions through and control the ball until passing it on. It’s ideal for people who enjoy a play style based on the famous tiki-taka, having their team occupy a wider part of the pitch. It is, therefore, an ideal situation for beginners or even if you want to adapt to a new formation or don’t have many good players on your team.

For the most experienced players with a great team to which they’ve adapted, it’s recommended to slide the bar to the right. If the slider is set to Long Ball, your teammates will try to lose their markers and call for passes more often while far away from the player who possesses the ball, which also offers risk. As a consequence, accidental long passes will happen more often. It’s the ideal choice for people who play with wingers and want to explore the flanks.

If you move the slider all to the right, the players will position themselves fast to receive the ball and keep a higher pace to reach the last third of the pitch as soon as possible. However, it represents more risk; after all, the passes tend to get longer and longer, and if the receiver can’t keep up with his teammate, the pass will most likely be intercepted by the opposition.
We suggest starting slow, then gradually moving the slider to the right as you get used to making faster decisions using the current FIFA 23 tactics. The faster you can go, the better, but try not to get too ambitious. Pay attention to how you’re performing. Are you ending your plays too soon, or are you overextending them? Focus on keeping up with your CPU teammates and having them keep up with you. Most people should set passing balanced because that seems safe enough and will still allow you to use long passing effectively. Remember, you have a particular instruction that can make your players attack more often, but only these FIFA 23 custom tactics will make them seek the ball and facilitate the team’s attack transition.
This tactic determines the speed of your players while going forward and how your teammates will run to receive the ball before they reach the last third of the pitch.

Players can choose one of four different tactics according to their attacking play styles. Those who don’t know what to choose should try Balanced. Possession is focused on a slow build-up play, while Direct Passing explores the space behind the back line, and Forward Runs push players forward deep.
We suggest starting slow, then gradually moving the slider to the right as you get used to making faster decisions using the current FIFA 23 tactics. The faster you can go, the better, but try not to get too ambitious. Most people should set passing balanced because that seems safe enough and will still allow you to use long passing effectively.
This tactic determines how wide your attack will be or, in other words, how far your players stay from each other while attacking.

At Narrow, the players will concentrate more in the middle. Crosses rarely happen, and the ball is played on a smaller field area. At Wide, players will be far from each other. It’s a decent decision for those who like to play with wide wingers.
First, we suggest you pay attention to the offensive style selected when setting up your offensive width. This tactic is strongly related to how you like to play and the formation you like to use. It can be used, for example, to turn a more narrow formation into a wider one, keeping up the generic shape.
This tactic determines how many of your players will run up to the opponent’s area when you’re going for the long run and how they’ll position themselves when they get there.

At Low Amount, only the striker(s) gets ahead, and eventually, someone comes near for the rebound. The delayed grounded cross is usually a good type of cross, but, in this scenario, it’ll be common for crosses to get aborted; you’ll have to redesign your plays more often.

On the other hand, at High Amount, many of your players will run up to the opponent’s area, and most of them will get as near the goal line as possible. They usually tend to position themselves near the less crowded post, where there is more free space. It’s a riskier option because, although you’ll get more chances to finish, you’ll be exposed to counterattacks if that doesn’t happen.
In our opinion, you should set this tactic between 4 and 6. Only go higher or lower than that if you feel like your playstyle demands it.
This tactic determines how many of your players will be in the opponent’s area when you’re going for a corner and how they’ll position themselves there.

At Low Amount, only the striker(s) gets ahead, and eventually, someone comes near for the rebound. The short corner is common in these situations, and crosses to the penalty area are rarer.

On the other hand, at High Amount, many of your players will be in the opponent’s area. So it’s a riskier option because, although you’ll get more chances to finish, you’ll be exposed to counterattacks if that doesn’t happen.
In our opinion, you should set this tactic to Normal Amount leaving the other options to be used according to your needs during the match.
This tactic determines how many of your players will be in the opponent’s area when you’re going for a free-kick, and how they’ll position themselves there.

At Low Amount, only the striker(s) gets ahead and eventually, someone comes near for the rebound. In these cases, crosses should be avoided.

On the other hand, at High Amount, many of your players will be in the opponent’s area. It’s a riskier option because, although you’ll get more chances to finish, in case that doesn’t happen you’ll be exposed to counter attacks.
In our opinion, you should set this tactic to Normal Amount leaving the other options to be used according to your needs during the match.