
Quick Tactics for FUT
While in-game, you can change your game plan moving your D-Pad to the left or to the right. However, there are a few quick tactics that you can use to move your D-Pad up or down.
You can mix and match any of the D-Pad Tactics to best suit your play style and preference. They will help you to change your playstyle in crucial moments without having to
How to activate a FIFA 23 D-Pad Tactic?
- While playing a match, press up on the D-Pad to display the tactics related to attacking play, or press down to display the tactics related to defensive play (up and down arrows on PC and Stadia);
- Use the D-Pad to select the quick tactic you want to activate.
- Defensive
- Striker Drop Back;
- Team Press;
- Overload Ball Side;
- Offside Trap.
- Attacking
- Get In The Box;
- Attacking Full Backs;
- Hug Sideline;
- Extra Attacker.
Striker Drop Back

Striker Drop Back makes your Striker or Strikers assist when defending against the opposition. They will be in a more defensive position that will cover more runs, increasing your defensive stability. This is the option when you want to make your team super defensive.
This tactic instructs your Striker to help your team out defensively by acting more like a midfielder. If you have more than 1 Striker in play, Striker Drop Back will consider defensive work rates and the marking attribute before selecting which player will drop back. The Striker Drop Back Tactic can reduce your offensive options, but the trade-off is that your team can have more defensive support.
Team Press
Team Press makes your team apply constant pressure on your opponent. It has the same effect of ‘Constant Pressure’ on defensive styles from custom tactics. Your team will push up on the field and play pressing when activated. This makes it very hard for your opponent to find a secure way to pass it.
Since your team will be covering a lot more ground with Team Press active, expect to be losing more stamina than usual. Your defensive line will also be playing higher, increasing the risk of counter-attacks.
Overload Ball Side
Overload Ball Side will position many of your players on the side of the pitch where the ball is located. This will tighten the space for your opponent, and your defense will be more compact.
When Overload Ball Side is active, your team shape will try to shift towards the ball, potentially ignoring defensive Player Instructions and marked opposition players. It can be beneficial for trying to control the middle area of your half, but it can expose you to wide attacks.
Offside Trap
Offside Trap moves up your defenders along the pitch to turn through ball passes by the opponent to offsides. It tells your defenders to quickly push up as a unit to catch an attacker offside.
This is the only tactic that you don’t have to turn off. Instead, when you activate it, it works immediately. When you do it, your defenders will push up for the offside Trap, and right after, they will return to their normal position and behavior. They won’t play an offside trap anymore unless you reactivate it. Be extra careful when triggering an Offside Trap, though, using it at the wrong moment can often lead to easy breakaways for the attacker.

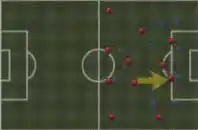
Get In the Box
Get In the Box makes more players get into the box for crosses. When selected, the players who are at the edge of the box will be going to get into the box for a cross, but also the players back in the midfield will going to join the attack and will get to the edge of the box.
You can use this tactic if you love crossing or need to score a goal. ‘Get in the Box’ will give you a higher chance of finding a player in an excellent position to convert a cross and score a goal. When this tactic is selected, you lose the defensive back up, and you are more vulnerable to counter-attacks.
Attacking Full Backs
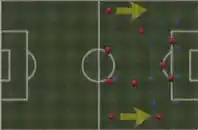
Attacking Full Backs makes your Full Back Players go on the offensive to add more threats against your opponent. They move to a more advanced position until you lose possession. They push forward similarly to how a Wing Back can push forward in some five defender formations.
Remember to have Full Backs with good offensive skills if you use this tactic. You can also use this at a corner kick chance. You can use this tactic to have more options on the attack, but, on the other hand, your full-backs won’t be in a defensive position anymore, and your opponent will have an easier time being successful in the counter-attack.
Hug Sideline

Hug Sideline changes how your outside players (full backs, wing backs, and wingers, including right and left midfielders) position themselves. This strategy will make them stay close to the sideline when attacking. This offers you new ways to switch the side with a lob pass.
Want to send your goal kick wide, but your players are narrowly positioned? Activate the Hug Sideline D-Pad Tactic before taking your kick, and your wide players will instantly try to spread out. Note that your players might already position themselves as wide as possible, depending on your formation and custom tactics.
Extra Striker
As the name suggests, Extra Striker makes another player take on the role of Striker, giving the opponent more things to worry about. The Extra Attacker tactic considers the attacking attributes and instructions of your players before determining which player should act as the Extra Attacker.
It weighs these factors during player selection, meaning that it will try to follow your player’s instructions in most cases. Usually, one of the midfielders with the best shooting stats starts acting as another striker. For instance, if you have your CDM set to Stay Back When Attacking, it’s improbable that they will be chosen as the Extra Attacker.