FIFA 23 FITNESS
FIFA 23 Fitness is a measure of the player’s physical condition.

FUT Fitness
Fitness is an English word that means “being in good shape”. It is directly related to one’s agility, speed, body balance, and motor coordination.
In FIFA 23 Ultimate Team, fitness is numerically measured on a scale of 1 to 99. The higher, the better. 99 corresponds to a player’s ideal physical condition. It’s the most increased fitness possible. 1 corresponds to a critical state you’re not going to want to be familiar with.
There are three ways to visualize a player’s fitness:
- In-Game (blue bar above the player name);
- Pause Screen (green bar above the player name);
- Team Management Screen (pause – team management – squad – select a player).
Fitness Bars
During a match, each player has two fitness bars:
- Instant bar
represented by a blue bar that goes red in extreme situations; - Accumulated bar
represented by a white bar overlaid by the blue bar.
How Fitness is Affected
In general, it’s safe to say that the fitness level will be higher or lower according to the following factors:
- Playing Time
A player’s spent fitness is directly proportional to how long he’s on the pitch. Generally speaking, if he plays just for one half, he’ll have spent half the fitness he would’ve spent playing 90 minutes. - Stamina
Stamina is different from player to player. If you want to see your players running at the end of the matches as they do in the beginning, you should check that they have a good ‘stamina’ IG stat. - Effort Made
Players get tired as they make an effort. This effort rate is measured in FUT 23 by the number of meters traversed and the intensity and frequency of the body’s work. - Injuries
If you keep an injured player on the pitch, the moment he gets into a challenge, he’ll have his fitness harshly lowered. - Work Rates
A player’s work rate decisively affects the number of fitness points he will lose.
Frequently Asked Questions
FIFA 23 Fitness measures the player’s physical condition.
A player with very low fitness will have poor performance. His movements will be slower, and he won’t be able to keep up with his teammates and opponents. Besides, he’s more likely to get injured.
We have seen many people saying that Fitness doesn’t exist anymore. That’s not true. The only (big) difference that was introduced in FIFA 21 is that all players start matches with the maximum Fitness possible. In other words, you no longer need to use fitness squads, apply fitness items or give a rest to your players. They will always be ready to play.
As a result of this change, fitness items and fitness coaches were removed from FUT.
As a result of this change, fitness items and fitness coaches were removed from FUT.
A player’s spent fitness is directly proportional to how long he’s on the pitch. So, generally speaking, if he plays just for one half, he’ll have spent half the fitness he would’ve spent playing 90 minutes.
Stamina is different from player to player. It says to you how fast a player’s fitness depletes. It is easy to understand that players with high stamina lose less fitness during the game than the ones with low stamina. For that reason, they finish the game less tired, i.e., with a higher fitness level.
If you want to see your players running at the end of the matches as they do in the beginning, you should check that they have an excellent ‘stamina’ IG stat.
If you want to see your players running at the end of the matches as they do in the beginning, you should check that they have an excellent ‘stamina’ IG stat.
Players get tired as they make an effort. This effort rate is measured in FUT 23 by the number of meters traversed and the intensity and frequency of the body’s work.
Players such as goalkeepers tend to move less around the pitch and usually don’t challenge the ball, therefore spending less on their fitness. This way, they can keep on playing for much longer than the average player without drastically decreasing their fitness. Anyway, the effort made by a player depends exclusively on who’s controlling. In that case, yourself.
Players such as goalkeepers tend to move less around the pitch and usually don’t challenge the ball, therefore spending less on their fitness. This way, they can keep on playing for much longer than the average player without drastically decreasing their fitness. Anyway, the effort made by a player depends exclusively on who’s controlling. In that case, yourself.
There are two types of injuries: the ones that make players get substituted during the match and those that lower their fitness. In the second case, it’s up to you. You can keep him on the pitch or not, knowing that he will not be playing at his best. Even if he stays still on the pitch, the moment he gets into a challenge, he’ll have his fitness harshly lowered, especially if that’s against a strong defender.
You may want to avoid the most aggressive ones. Usually, what causes this kind of injury is sliding tackles from behind. However, when you abuse a player’s fitness, making him travel the same exhausting path every time, you’ll be providing him with what’s necessary for a muscular injury to happen.
You may want to avoid the most aggressive ones. Usually, what causes this kind of injury is sliding tackles from behind. However, when you abuse a player’s fitness, making him travel the same exhausting path every time, you’ll be providing him with what’s necessary for a muscular injury to happen.
A player’s work rate, which can’t be altered in FIFA Ultimate Team, decisively affects the number of fitness points he will lose. It defines the predisposition a player has concerning the field zones he will occupy. That is how he will behave when you’re not controlling him. It’s independent of your effort because that one is up to you.
Even if you wanted to spare a single-player some work, you can’t do anything because the work rate determines if he will run or not while you are not controlling him… and you can’t control only one during a match, right?! So players with high work rates, defenders or attackers, are more likely to get tired faster.
Even if you wanted to spare a single-player some work, you can’t do anything because the work rate determines if he will run or not while you are not controlling him… and you can’t control only one during a match, right?! So players with high work rates, defenders or attackers, are more likely to get tired faster.
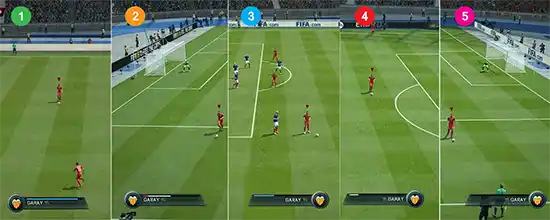
The Instant bar, represented by a blue bar that goes red in extreme situations, decreases during the sprints, ball disputes, or other efforts and then regenerates. The accumulated bar, represented by a white bar overlaid by the blue bar, will gradually reduce over a game and serves as a ceiling for the instant fitness bar.

Careful analysis of the image helps to clarify any questions.
The game runs from 1 to 5 and, as you can see, the biggest of the bars is getting smaller. In 1, the bar is almost complete. Unlike in 3, in 2, the player is running and therefore is momentarily more tired, i.e., less able to continue to make efforts. However, the white bar is more extensive which means that with a bit of rest he will be in better condition than in 3.
In 4, he is very close to having to leave the game because he can not make efforts for a long time anymore. He gets tired quickly. Finally, in 5, the player reached the limit situation. He has to leave, or he will get injured.