FC 25 SMART TACTICS
FC 25 Smart Tactics give you more control over your team while in-game, allowing you to modify certain aspects of your playstyle without having to pause a match.
Smart Tactics for Ultimate Team
Smart Tactics enable you to modify your approach in crucial moments without the need to pause the match.
Being able to use the D-Pad during a match to adjust your game strategy in real time is nothing new. However, the somewhat limited Quick Tactics, also known as D-Pad Tactics, have been replaced in FC 25 with a much more robust system.
Smart Tactics were designed to make in-game tactical decisions more approachable and intuitive while integrating tactics more fully into the match experience. The new system provides tactical suggestions based on the match’s flow, allowing for quick adjustments that can change the course of the game. Smart Tactics aims to help players quickly adapt to any situation with simple directional pad presses and animated visuals signifying tactical changes.
How to activate a FC 25 Smart Tactic?
- While playing a match, move the D-Pad once to display the Tactics Group (arrows on PC)
- Move the D-Pad again to select the action you want to activate.
- My Tactics;
- Tactical Focus;
- Quick Tactics;
- Tactical Suggestions.
My Tactics
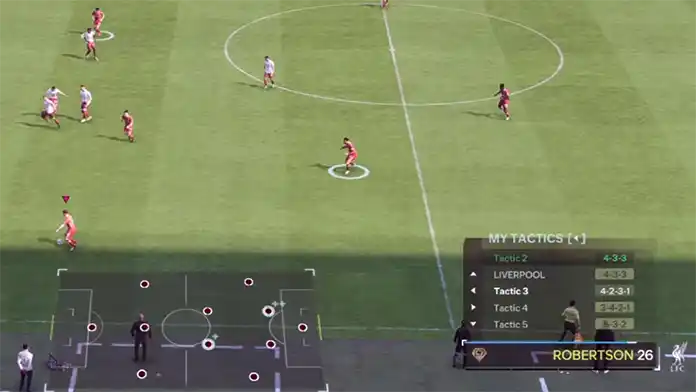
The first group of Smart Tactics allows you to change your current formation to one of the four others you’ve set as preferred.
By moving the D-Pad to the left, you’ll see the four additional formations along with the one you’re currently using (listed at the top). Another D-Pad movement instructs your team to switch to the new formation.
Just like in real life, this change can take some time to fully implement. During this transition, until all players adjust their positions on the field, you’ll see the message ‘Tactical Change in Progress.’ The changes will happen quicker if the ball goes out of play or the tactical change is made out of play. To cancel a request while in progress, return to the My Tactics menu and re-select your previous tactic.
| My Tactics | |
| Custom Tactic 1 | |
| Custom Tactic 2 | |
| Custom Tactic 3 | |
| Custom Tactic 4 |
Tactical Focus
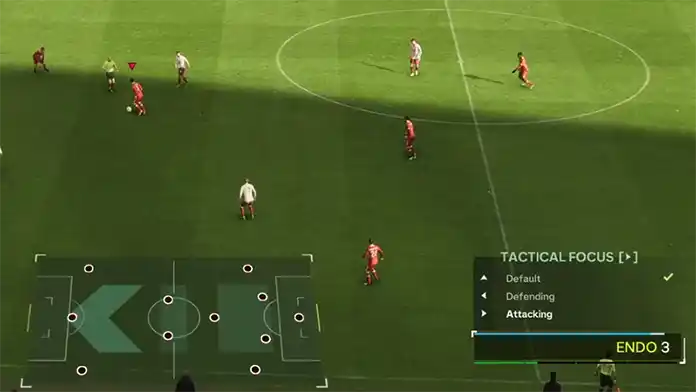
Instead of completely changing your tactic, the Tactical Focus modifies your current tactic, respecting the Formation and Roles that you have selected, but adjusting Build-Up Style, Defensive Approach, and Role’s Focus.
By moving the D-Pad to the right, you’ll see the three options which correspond to the setups you want to implement in your game: Default, Attacking, or Defending.
Choosing ‘Attacking’ as your Tactical Focus increases your Build-Up and Defensive Approach by one level each, while shifting all Role Focuses to a more offensive strategy. Similarly, selecting ‘Defending’ lowers your Build-Up and Defensive Approach by one level, adjusting all Role Focuses to be more defensive.
After requesting a change, you might see the ‘Focus Change in Progress’ message again, until your updated Focus takes effect. Also, when a player is already at a more defensive Focus when requested to change to a Defending Tactical Focus, there will be no impact to their Focus.
| Tactical Focus | |
| Default | |
| Defending | |
| Attacking |
Quick Tactics
Quick Tactics allow you to give specific instructions to your team. If you’ve played a previous edition of this game, you already know how this group works.
Attacking Full Backs, Hug Sideline, Extra Striker, Striker Drop Back, and Overload Ball Side have been removed, while the remaining three Quick Tactics stayed and were joined by a new one.
By pressing Up on the Directional Button, you’ll see the four quick tactics available:
Offside Trap
It involves advancing your defenders up the pitch to disrupt your opponent’s through-ball passes and catch attackers in offside positions. This maneuver instructs your defenders to move forward as a cohesive unit, aiming to eliminate potential offside opportunities.
Team Press
It directs your team to apply constant pressure on your opponent. When activated, your team will push forward and press aggressively, making it difficult for your opponent to find safe passing options.
Overload Set Pieces
It increases the number of players in the box during Free Kicks and Corner Kicks. Contrary to the other quick tactics, it can be enabled at any moment except during a Set Piece itself.
Get in Box
It encourages more players to enter the penalty area to anticipate crosses. When activated, players on the edge of the box will make runs toward the goal, and midfielders will also push forward to support the attack, positioning themselves near the box’s edge.
| Quick Tactics | |
| Offside Trap | |
| Team Press | |
| Extra Striker | |
| Get In Box |
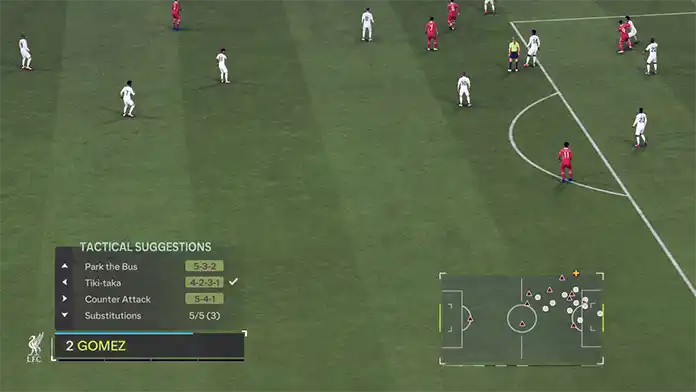
Tactical Suggestions
A real-time tactical suggestion system suggests tactical changes based on the match’s flow and you can implement them by pressing Down on the Directional Button.
The Substitution sub-menu will show your Suggested Subs, Custom Subs, or a mixture of both and can display up to four entries at a time.
Balanced
A structured approach that aims to maintain team shape to stay strong defensively while still being able to construct attacks.
Tiki Taka
This approach demands that the entire team be comfortable on the ball, as it uses short passing and constant rotations to create space for attacks.
Long Ball
A direct approach that gets the ball forward quickly, relying on the strength and athleticism of powerful forwards to exploit space behind defenders and battle for second balls and rebounds.
Counter Attack
This approach sees the team sit back and defend the area before rapidly breaking when possession is regained.
Wing Play
This approach uses the entire width of the pitch, switching play to wide positions and overloading the flanks to create crossing opportunities.
Park the Bus
Disciplined and well-organized defending, with a compact defensive line to prevent opposition attacks.
Pressing
our team will attempt to win back the ball quickly and high up the pitch, using fast turnovers to create goalscoring opportunities.
| Tactical Suggestions | |
| Tactic Suggestion 1 | |
| Tactic Suggestion 2 | |
| Tactic/Focus Suggestion | |
| Substitution |
Frequently Asked Questions
While in-game, you can adjust your game plan by using the D-Pad. This allows you to modify your playstyle during crucial moments without pausing the match.
FC 25 Smart Tactics are divided into four groups:
- My Tactics;
- Tactical Focus;
- Quick Tactics;
- Tactical Suggestions.
Attacking
- Defend -> Balanced
- Balanced -> Attack
- Defend -> Build-Up
- Defend -> Roaming
- Roaming -> Attack (for CM Playmaker) or Attack -> Roaming (for RW/LW Inside Forward)
- Balanced -> Roaming
- Attack -> Complete
- Balanced -> Defend
- Attack -> Balanced
- Build-Up -> Defend
- Roaming -> Defend
- Attack -> Roaming (for CM Playmaker)
- Roaming -> Balanced
- Complete -> Attack
- Wide -> Balanced
FC 25 has four quick tactics:
- Team Press;
- Overload Set Pieces;
- Offside Trap;
- Get In The Box;
This tactic encourages your AI-controlled teammates to apply heavy pressure on your opponent for up to 20 seconds or until they lose possession. When activating Team Press, remember that there is a 100-second cooldown before it fully recharges.
This tactic tells your defenders to quickly push up as a unit, intending to catch an attacker offside. Be extra careful when triggering an Offside Trap, though, using it at the wrong moment can often lead to easy breakaways for the attacker.
This tactic maximizes the number of players trying to get inside the box when you’re in a crossing situation.
To deactivate a Quick Tactic, you have to perform the same input used to activate it in the first place. For example, you can use the arrow keys when playing with a keyboard.
This is performed instantly, so it can’t be deactivated.
FC 25 Quick Tactics are a great way to quickly adapt to the current game situation and enhance your tactical options. However, it’s important to understand that while making a tactical adjustment can benefit your team, it may also come with trade-offs.
You will always have 2 suggested Tactics, like Tiki-Taka or Counter Attack, then either 1 Tactical Focus or an extra suggested Tactic, and access to the Substitutions menu.
Prompts that remind you when new suggestions are available and give you context for those suggestions will pop up at crucial moments with specific suggestions. These prompts can also be disabled in the settings.
Inside the Tactical Suggestions menu, you can press down on your directional button to access the new substitutions menu. It will show your Suggested Subs, Custom Subs, or a mixture of both and can display up to four entries at a time.
Simply press the directional button desired to request that sub. You can press as many as you want, and to cancel them you can press the same direction again. Before going into the menu, you can see the number of subs and sub windows remaining. Note that running out of subs or sub windows will make this menu inaccessible.
Simply press the directional button desired to request that sub. You can press as many as you want, and to cancel them you can press the same direction again. Before going into the menu, you can see the number of subs and sub windows remaining. Note that running out of subs or sub windows will make this menu inaccessible.