FIFA 21 CONTROLLER SETTINGS
FIFA 21 CONTROLLER SETTINGS
FIFA 21 Controller Settings let you customize your gameplay experience. To access these options, you can head over to the Customise tab in the FIFA 21 Main Menu, select Settings, and then go into Customise Controls. You’ll find a number of new and familiar settings, and all of them can be tweaked to your preference. Be aware that there is no such thing as best settings. You should customize your FIFA 21 Controller Settings in the way that best suits your play style. Let’s see one by one, what they are and how you can adjust them.
Select whether you want to show or hide the Trainer during game play.

The FIFA trainer is a helpful tool which can teach you as you play whilst showing you the actions you’re currently taking. It can be further customized when you pause a match and go into the Trainer’s Settings.
Setting the FIFA Trainer to Show enables its functionality during your matches, and setting it to Hide will ensure it doesn’t display.
Select whether you want to show or hide the Trainer during game play.
Select whether you want to show or hide the Trainer during game play.
Select ON or OFF to enable timed finishing, giving you the ability to improve the accuracy and power of shots by double-tapping the button assigned to the “Shoot” action as you kick the ball.
You can initiate a shot with your controlled player by pressing your shooting button. This will begin the animation for the shot, and assuming you press nothing else and are not interrupted, your player will try to shoot the ball. Timed Finishing gives you the opportunity to press shoot a second time, in order to potentially pull off a better shot.
When Timed Finishing is on, double-tapping the shooting button during the shooting animation will help determine a shot’s result. Watch your player closely during their shooting animation, and press the shoot button a second time just as they’re about to connect with the ball.
If the second press is timed at the right moment, regular shots can receive an increase in accuracy and power. Finesse shots can receive more accuracy and curve, but not power. The same increases are applied to regular and finesse flair shots, respectively. If the second press is timed slightly early or slightly late, the shot will be more likely to go astray.
If the second press is timed extremely early, the shot will be much more likely to go astray.
If the second press is timed after contact with the ball has been made, the shot will not receive any boosts or downgrade and will just function as a normal shot.
Turning Timed Finishing Off means that you can ignore this mechanic. However, you will miss out on the ability to boost your shots.
Trigger a timed finish by double tapping the button assigned to the “Shoot” action when attempting a strike. The precision and timing of the second button tap determines the result of the contact; perfectly timed strikes increase a shot’s accuracy and power, while poorly timed contacts make the shot more likely to miss the mark.
Disable Timed Finishing that double tapping the shot button to shoot will not impact the shot quality.
Select ON or OFF to show which player you’ll swap controls with while defending using the X button on the controller.
There are 2 options for the Next Player Switch Indicator, On (default) and Off. On means that you will see an icon above the player you will switch to if you use the default player switching button (L1 on PlayStation and LB on Xbox). The icon lets you know what to expect from your next player switch. Off means that you will not see an icon when you perform a switch with the appropriate button.
This feature was previously known as ‘Second Defender Switch Icon’.
Enables the Icon which shows to which player you will swap controls when pressing L1/LB while defending.
Disables the Next Player Switch Icon.
Select ON or OFF to enable or disable AI-controlled players and User-controlled players will from attempting to intercept a pass automatically when the ball is close by.
When set to On, your controlled player will sometimes try to automatically block or intercept passes within their range. Your AI teammates will also attempt blocks/interceptions, depending on the situation. There’s an element of risk vs reward with this setting because it can naturally result in a greater number of automatic block attempts. However, this also means that there can also be a greater amount of missed blocks/interceptions, causing unwanted defensive situations. If you want more control over what your controller player does on defence, you might be more interested in the Off option.
When turned Off, the user-controlled player will need to manually perform a tackle or block in order to attempt a block. AI teammates will continue to attempt interceptions and blocks, depending on the situation. Turning Pass Block Assistance Off can give you more control over blocking attempts, but it’s generally more challenging as well.
Enable Pass Block Assistance so that your AI controlled players and User controlled players will attempt to intercept a pass automatically when the ball is close by.
Disable the Pass Block Assistance for your User controlled players so they don’t attempt to intercept the ball when it’s close by. Instead, they will stay in position and you manually need to launch a block/tackle.
Select either “Air Balls and Loose Balls,”or “Auto,” to enable between switching between players during certain passes while playing, or select “Manual” to take control.
Auto Switching always tries to select the best-suited player for the current situation based on who is most likely able to take the ball.
Air Ball and Loose Ball Auto Switching means that the player you control can be switched by the game when the ball is 8 feet in the air, or higher. This Auto Switch occurs once and selects the player best suited to get to the ball based on its trajectory. An Auto Switch can also occur during a loose ball situation, such as when a defender gets a touch on a pass and changes the ball’s path.
If you set Auto Switching to Auto, the game will try to switch to the best suited player in every situation. Keep in mind that even when this assist enabled, you can still manually switch with the right stick or the player switch button.
The Manual option means that there will not be any Auto Switching in effect.* * Note that the game will always Auto Switch to the player in possession of the ball, unless you’re playing a mode in which you control only 1 player on the pitch.
AI will only switch for you on Lobs and Crosses, and Loose Balls. Otherwise, you are on your own.
AI will switch to the best player for you. If you would like to switch to someone else you can still override our selection by pressing the switch button.
AI will never switch for you, you are on your own.
Select between “None,” “Low,” “Medium,” and “High” to keep the player you AUTO switch to moving in his current direction for a short period of time. This will allow you to orient your intended direction for the new player.
Auto Switch Move Assistance keeps the player you’ve been Auto Switched to moving in their current direction for a short period of time. So if there’s an Auto Switch to a player moving right, they will briefly continue to move right. The Low and High options affect how long the Auto Switched player keeps moving in the same direction. None means that no Auto Switch Move Assistance will take place.
This setting has no impact when you manually switch players. For example, if you have Auto Switching set to Manual, and you have Auto Switch Move Assistance set to High, the Move Assistance option has no effect. Depending on the circumstances, there will be times that your player will keep moving after you perform a Manual Switch. For example, this can happen when you switch to a player who is mid sprint and needs time to slow down. This is unrelated to Auto Switch Move Assistance.
Auto switch move assistance will keep the player you AUTO switch to moving in his current direction for a short period of time. This gives you time to orient your intended direction for the new player.
Auto switch move assistance will keep the player you AUTO switch to moving in his current direction for a short period of time. This gives you time to orient your intended direction for the new player.
Auto switch move assistance will keep the player you AUTO switch to moving in his current direction for a short period of time. This gives you time to orient your intended direction for the new player.
Select whether your jockey speed will be assisted or manual. These options can help your player to stay to your opponent.
Assisted means that when you Jockey with a player, they will try to decelerate if you’re about to run past the attacker. This assist can help you stick closer to the player you’re trying to mark. In this example, the defender is Fast Jockeying (Sprinting + Jockeying). Note how the assist helps decelerate him.
Manual Jockeying means that there will be no help with changing the speed of your player, it’s up to you to control them as you see fit. In this example, the Jockey Assistance is set to Manual, and the defender is Fast Jockeying (Sprinting + Jockeying). Note how he goes off in the wrong direction due to the sprint.
Jockey speed will be assisted to help you stay close yo tour opponent, but there is no directional assistance.
When jockeying there will be no speed or directional assistance. You are on your own.
Select ON or OFF to control the flair pass.
Players will perform Flair Passes contextually in the appropriate situations.
Players will never perform Flair Passes unless the flair modifier is held.
Select ON or OFF to control the clearances.
Players will perform Clearances contextually in the appropriate situations.
Players will never perform Clearances unless the clearance button is pressed.
Select ON or OFF to control the shots.
Players will perform automatic shots contextually in the appropriate situations.
Players will never perform automatic shots.
When enabled, the CPU AI will then take control of the on-ball player allowing you to move your off-ball player and ask for a pass back in a better position.
Enable this feature to lock a player pressing both left and right sticks and then switch away from the dribbler using the right stick flick.
Disable Player Lock feature and mechanics.
When enabled, it will make your players automatically perform Agile Dribbles in certain situations, for example when in a 1v1 situation against an opponent.
Agile Dribbling is a way to keep close control of the ball. Inspired by some of the best dribblers in real life, Agile Dribbling is intended to give you the ability to quickly move the ball from side to side to help dribblers get away from defenders, and to use fast footwork to help you create space by tricking defenders into over-committing to tackles.
Agile Dribbling is a way to keep close control of the ball. Inspired by some of the best dribblers in real life, Agile Dribbling is intended to give you the ability to quickly move the ball from side to side to help dribblers get away from defenders, and to use fast footwork to help you create space by tricking defenders into over-committing to tackles.
Enable Contextual Agile Dribbling for left stick dribbling in one-to-one situations.
Disable Contextual Agile Dribbling for left stick dribbling in one-to-one situations.
When playing with this option, your headers will not be assisted in any way, with the aim and power used when performing the header determining the initial target for the header before the header is than potentially impacted by error.
To ensure fairness in competitive modes across FIFA, playing with Manual Heading is mandatory in the following modes:
– All FUT modes, including FUT Champions, FUT Rivals and – FUT Squad Battles
– All Pro Clubs modes
– FIFA Seasons, FIFA Co-Op Seasons and FIFA Online
– Friendlies
To ensure fairness in competitive modes across FIFA, playing with Manual Heading is mandatory in the following modes:
– All FUT modes, including FUT Champions, FUT Rivals and – FUT Squad Battles
– All Pro Clubs modes
– FIFA Seasons, FIFA Co-Op Seasons and FIFA Online
– Friendlies
Enable Header Assistance for left passes and shots for a more casual gameplay experience.
Disable Header Assistance so that headers for passing and shooting are manual and are more accurate. This is a competitive header mechanic to add more skill to headers for everyone.
Select an option to decide whether a player or the ball will act as the center point of reference for any Right Stick switching.
Player Relative Right Stick Switching means that whoever you’re controlling acts as the reference point for your next switch with the right stick. You can picture that player as the center of your right stick, so directions will be in relation to that player.
Ball Relative Right Stick Switching means that the ball acts as the reference point instead of the player. You can imagine the ball as the central point of your right stick, so directions will be relative to the ball.
When defending, the player you control will act as the center point of reference for any Right Stick switching (This is the default setting).
When defending, the ball will act as the center point of reference for any Right Stick switching.
Select an option to decide whether pass direction and power will be assisted or manual to help play passes into the receiver’s path and avoice opponent players.
Pass direction and power will be assisted to help play passes into the receiver’s path and avoid opponent players.
The direction you point is the direction the pass goes, and the longer you hold the pass button, the stronger the pass will be.
Pass power is assisted, but AI will only help you a little with the direction.
Select an option to decide whether through ball direction and power will be assiste to help play passes into the receiver’s path and avoid opponent players.
When using the Assisted option, you can expect to receive help similar to regular passing. Assisted through balls generally try to avoid the opponent’s players and land neatly in the passing target’s path.
When using the Manual option, you will not receive any help. Like with regular passing, your player will attempt to execute your inputs to the best of their ability.
Through ball direction and power will be assisted to help play passes into the receiver’s path and avoid opponent players.
The direction you point is the direction the pass goes, and the longer you hold the pass button, the stronger the pass will be.
Through ball direction and power will be partially assisted to help play passes into the receiver’s path and avoid opponent players.
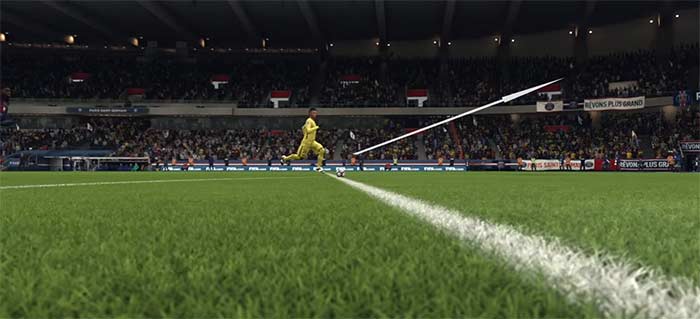
Select an option to decide whether shot direction will be assisted to always aim towards the goal.
When using the Assisted option, your players will always attempt to aim shots in the direction of your opponent’s goal. This level of assistance generally makes it easier for you to aim at hard to reach areas of the goal since your player will always try to shoot towards the opponent’s goal. For example, if your back is towards the opponent’s goal but you take a shot, this assist will try to help your player direct their shot towards the opponent’s goal. Ultimately, things like your player’s attributes and the situation (open vs. under pressure for example) they are in will determine the final result of the shot.
When Shot Assistance is set to Semi, you have to actively aim towards the goal in order to attempt a shot on goal. You will receive a little bit of help with your directional input if you’re not quite aiming at the goal.
When Shot Assistance is set to Manual, there is no directional help with your shots. Your player will try to aim their shots wherever you’re aiming, and you have to aim between the opponent’s goal posts to attempt a shot on target.
Shot direction will be assisted to always aim towards the goal.
The direction you aim is the direction the shot will go.
You have to aim toward the target to keep your shots on target.
Select an option to choose the amount of power that is used during cross direction passing.
When the Assisted option is enabled, you will receive a great amount of help with cross direction in order to target your teammate. How long you hold the crossing button for generally has no effect and the cross will generally be directed towards the front or back post areas.
Semi Assisted crossing will help you with the direction of your cross, but you’ll have to manually control the crosser’s target selection range by holding down the crossing button. Holding down the crossing button for longer will generally result in the cross going towards the far post. However, keep in mind that your player’s attributes always play a role in every action, including crossing.
Manual crossing means that you will not receive any help, and your players will try to execute your inputs to the best of their abilities. This option gives you the most control over crossing, but you’ll need to carefully consider your direction input, as well as how long you hold down your crossing button.
Cross direction will be assisted towards a team mate. Cross power will be assisted to front or back post areas and there will be no power bar on the cross.
The direction you point is the direction the cross goes, and the longer you hold the button to perform crosses, the stronger the cross will be.
You have to choose the right power, but cross direction will be assisted to front and back post areas.
Select an option to choose the consistency of lob passes and how strong the pass will be.
These options function in the same way as the Passing Assistance ones, except that there is no “Semi” setting for lobbed passing.
When using the Assisted option, you can expect to receive help similar to regular passing. Assisted through balls generally try to avoid the opponent’s players and land neatly in the passing target’s path.
When using the Manual option, you will not receive any help. Like with regular passing, your player will attempt to execute your inputs to the best of their ability.
Lob pass direction and power will be assisted so lob passes will be played towards a team mate.
The direction you point is the direction the lob pass goes, and the longer you hold the lob pass button, the stronger the pass will be.
Select an option to choose whether balls relatively close to your body will be automatically saved.
There are 3 Save Assistance options that affect a player controlled goalkeeper, Assisted, Semi, and Manual. These assists can only be active when a user is controlling a goalkeeper.
When set to Assisted, balls that come close to your body will be automatically saved. All other balls require the right positioning and timing. The directional input of your save doesn’t matter due to the assist. If you were to aim your save towards the left, it could still get corrected towards the right side.
When set to Semi Assisted, balls that come close to your body will be automatically saved, but you’ll need to have the right positioning, direction, and timing for the rest.
When set to Manual, only reflex saves will be automatic. All other saves require the right positioning, direction, and timing.
Balls relatively close to your body will be automatically saved, for all the others you need to get positioning and timing right. Direction doesn’t matter.
Just reflex saves are automatic, every other ball will depend on your positioning, timing, and the direction you attempt to save.
Balls close to your body will be automatically saved, for all other balls you need to get positioning, direction and timing right.
Select ON or OFF to control how fast you sprint.
Turning on Analog Sprint means that you’ll have to press your sprinting button all the way to maximize the speed of the controlled player’s sprint. If you press it in only halfway, the controlled player’s sprint speed is reduced accordingly. To clarify, when you push your sprinting button in all the way, you’re telling your player to run at 100% of their speed, as dictated by their attributes. When you push your sprinting button halfway, you’re telling your player to run at 50% of their speed, as dictated by their attributes.
When you have Analog Sprint Off, your controlled player will try to reach maximum sprint speed no matter how far you’ve pushed your sprint button. Think of it as you’re either sprinting all the way, or not at all.
Turning on Analog Sprint allows you to control how fast you sprint. The further you hold sprint button, the faster the player will run.
Turning off Analog Sprint doesn’t allow you to control how fast you sprint.
Select between Tactical or Legacy Defending. Tactical Defending gives you the ability to time your tackles and maintain your postion like never before. Legacy Defending gives you the familiar defending controls of past FIFA titles.
Tactical Defending uses modern controls and mechanics, giving you more direct and indirect control when defending. Tactical Defending lets you dictate the intensity of your challenges and enables mechanics like jockeying and Teammate Contain.
Legacy Defending uses controls and mechanics from older FIFA titles for a more old school experience. You can use this setting for a more “retro” FIFA experience, but keep in mind that Legacy Defending is not available in online play.
It gives you the familiar defending controls of past FIFA titles.
It gives you the ability to time your tackles and maintain your position like never before.
Select an option to decide when the pass receiver is locked.
When Late option is enabled, you’ll have time to alter your passing directional input as close as possible to the ball being kicked. Simply put, Late means that you can change where you’re aiming your pass until very late in a passing animation. This option can give you control of the passing direction for longer, but it generally requires you to be more careful about accidentally changing your aim in the last moment. If you’re used to playing past FIFA titles, you will likely be more comfortable with this setting to start with. Keep Pass Receiver Lock set to Late if you want to maintain aiming control for as long as possible when you make a pass.
When Early option is enabled, it will lock in your directional input early on in the passing animation. This means that you cannot change where you’re aiming your pass in the last few moments before making contact with the ball. It allows you to worry less about accidentally changing pass direction, but it generally requires you to be more precise with your passing.
The pass receiver is locked as late as possible, close to the time when the ball is kicked.
The pass receiver is locked early, at the time when the kicking animation begins.
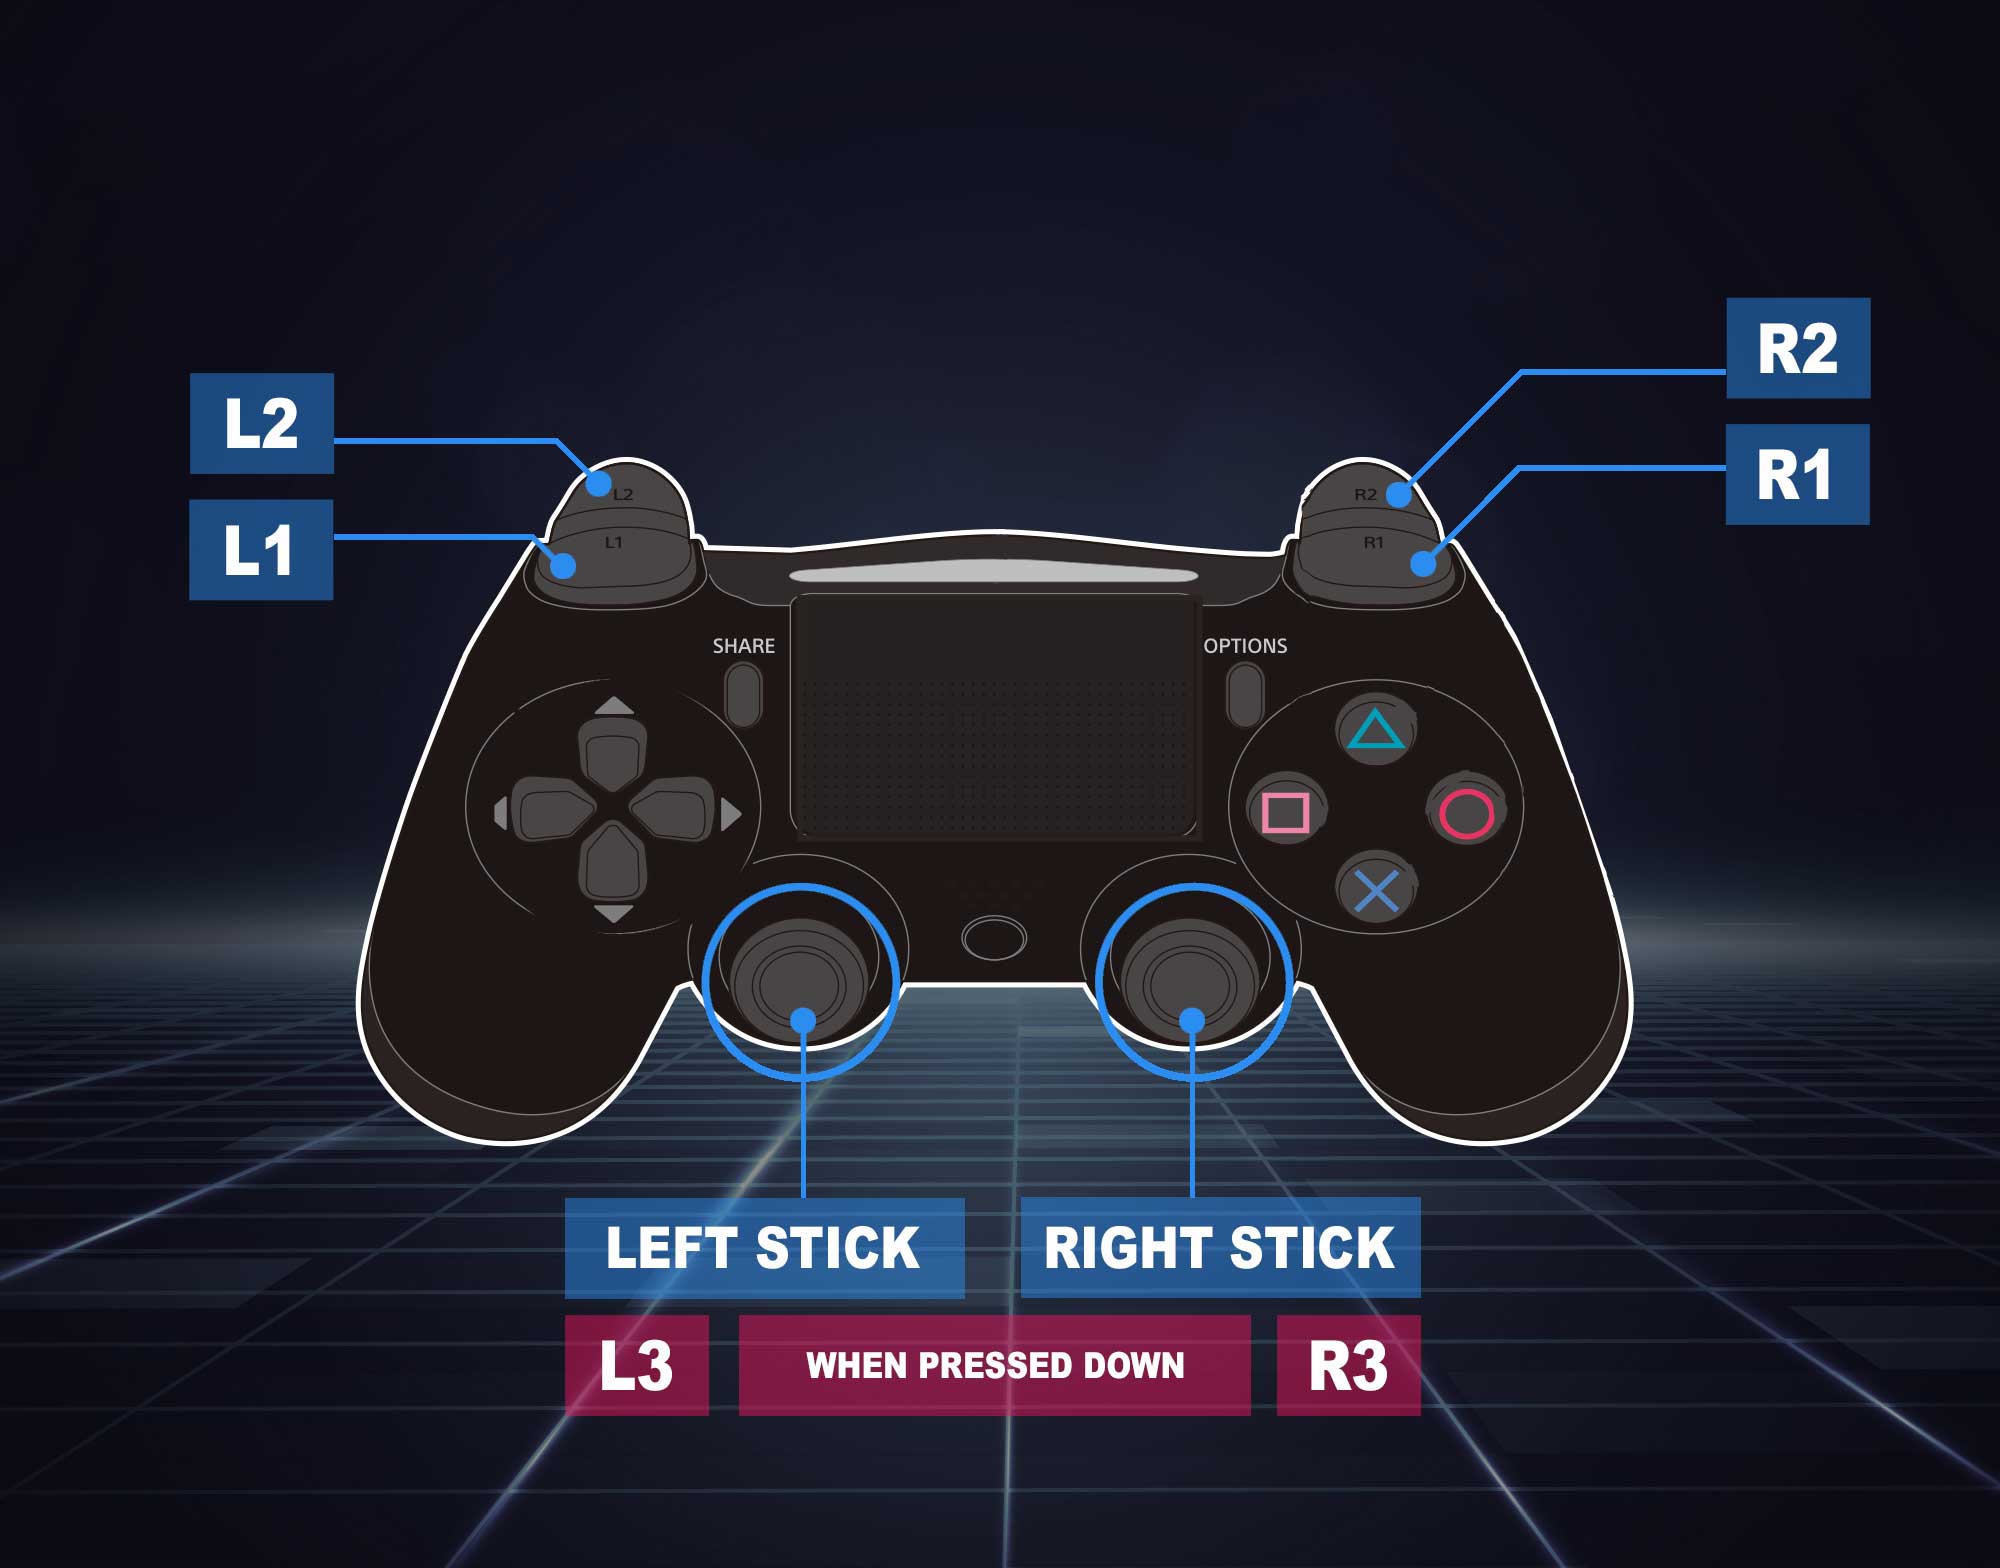
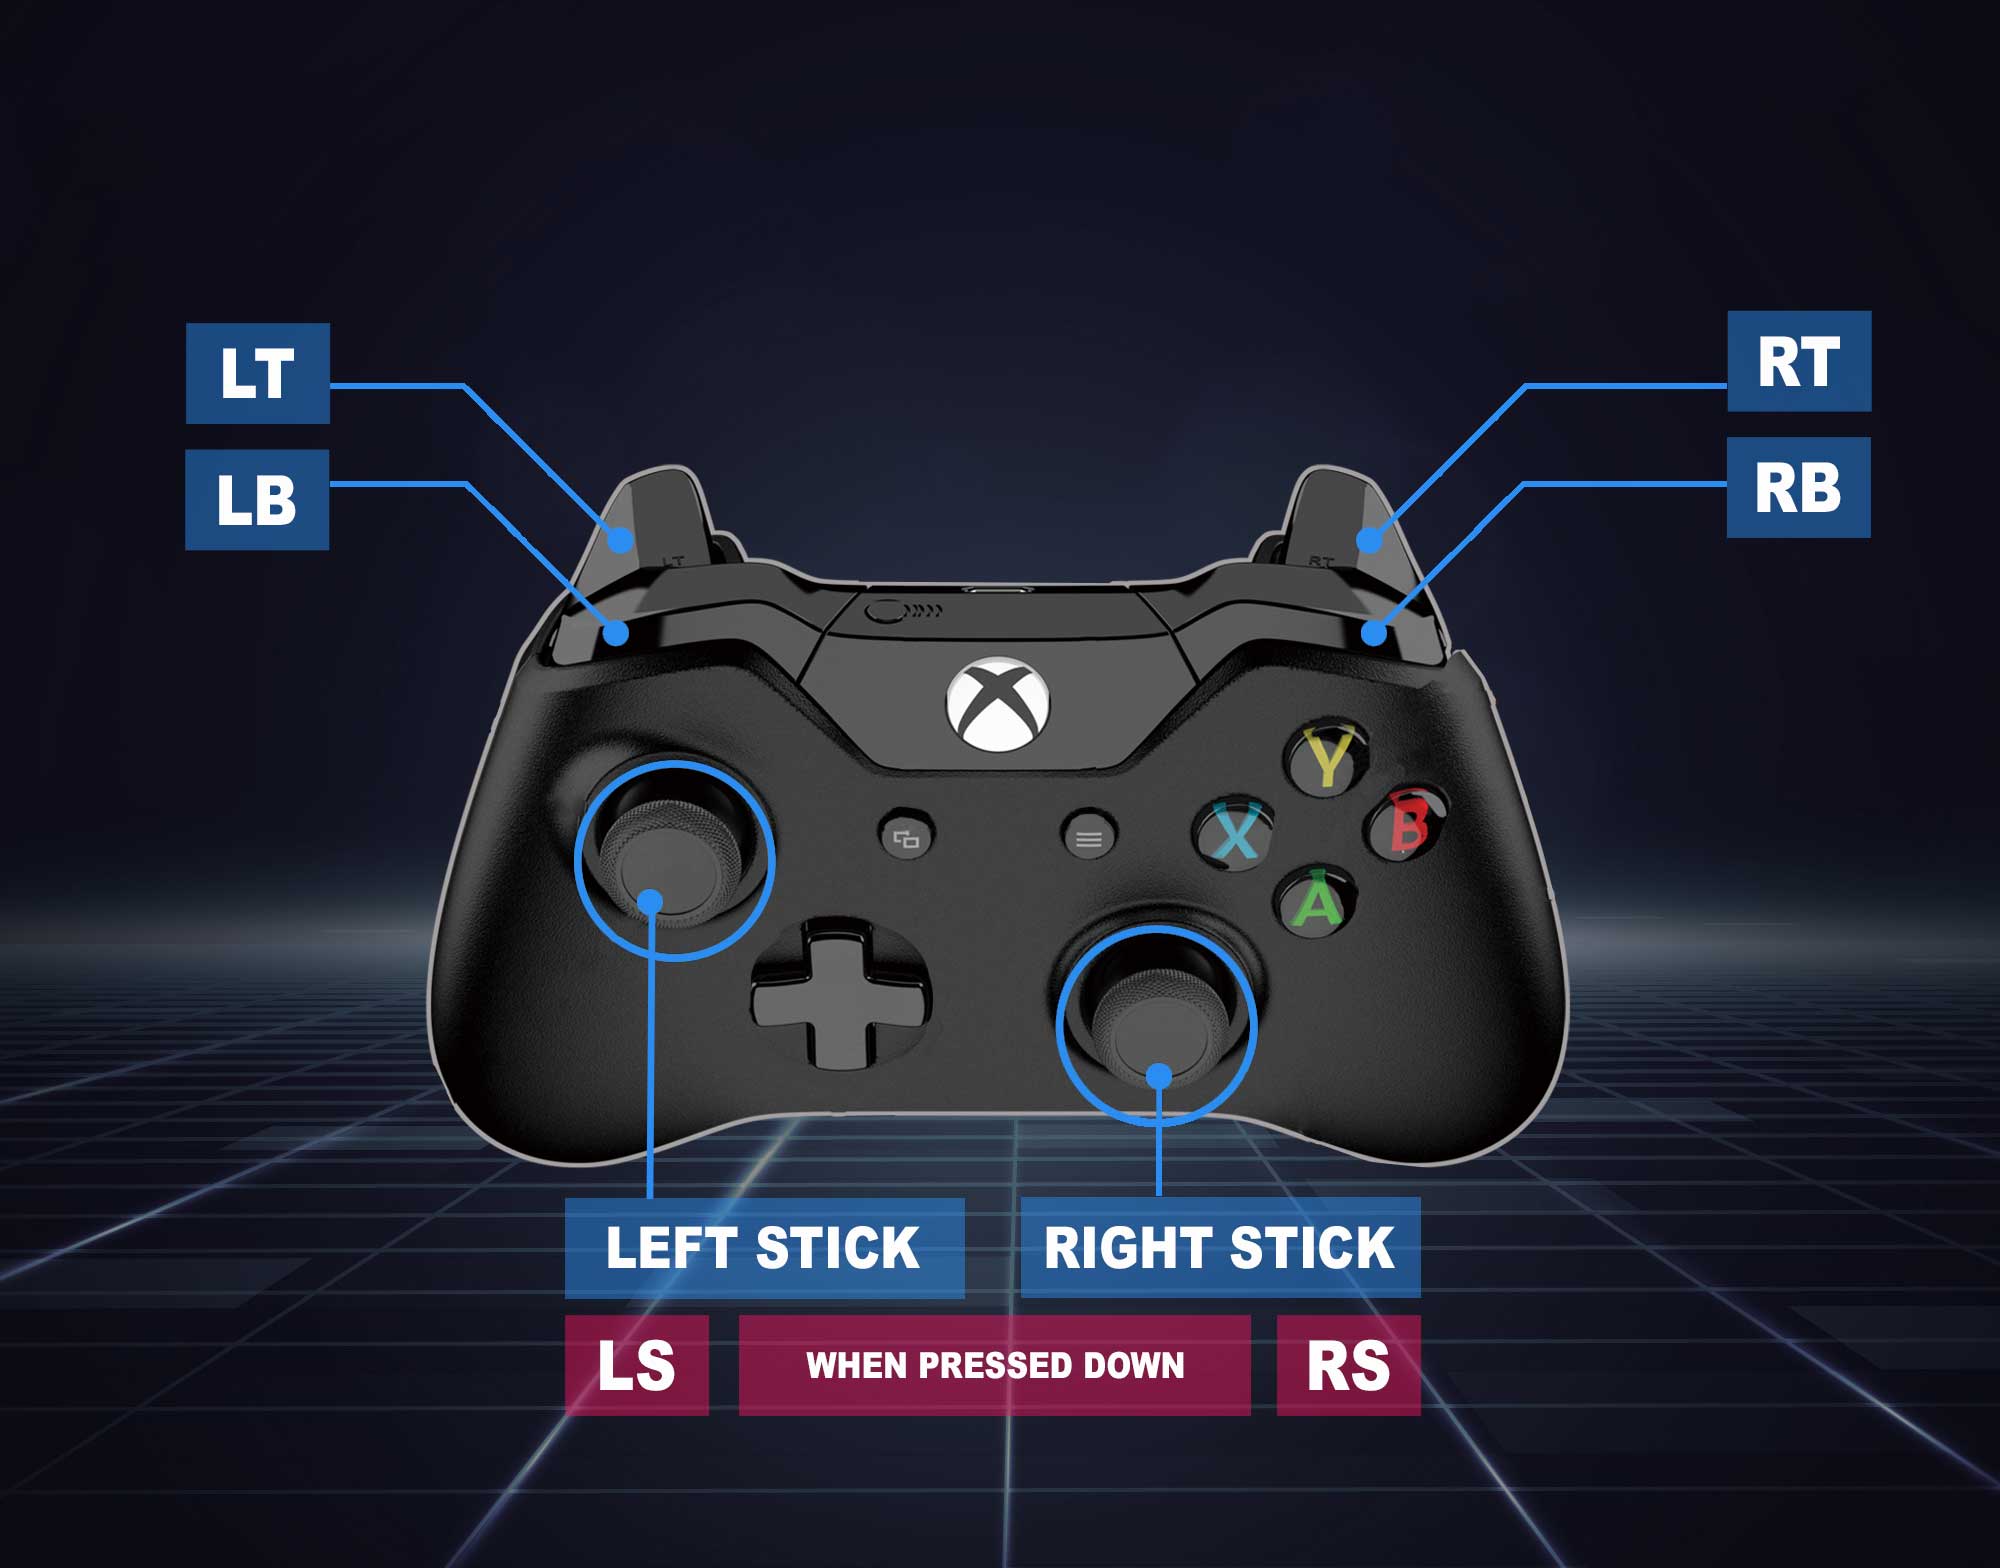
FIFA 21 CUSTOMISE CONTROLS
FIFA 21 Customise Controls let you change the controls to any button of your choice by pressing the X button. To access these options, you can head over to the Customise tab in the FIFA 21 Main Menu, select Settings, and then go into Customise Controls. Before each match you can easily switch between Classic and Alternate configuration.
| Through Ball | ||
| Lob Pass/Cross/Header | ||
| Shoot/Volley/Header | ||
| Short Pass/Header | ||
| Player Run/Modifier | L1 | L1 |
| Finesse Shot Modifier | R1 | R1 |
| Protect Ball | L2 | L2 |
| Sprint | R2 | R2 |
| Move Player | L | L |
| Tactics & Mentality | DPad | DPad |
| Rush GK (Hold Down) | ||
| Sliding Tackle | ||
| Tackle/Push or Pull (when chasing) | ||
| Contain | ||
| Change Player | L1 | L1 |
| Teammate Contain | R1 | R1 |
| Jockey | L2 | L2 |
| Sprint | R2 | R2 |
| Move Player | L | L |
| Tactics & Mentality | DPad | DPad |
| Through Ball | ||
| Lob Pass/Cross/Header | ||
| Shoot/Volley/Header | ||
| Short Pass/Header | ||
| Player Run/Modifier | LB | LB |
| Finesse Shot Modifier | RB | RB |
| Protect Ball | LT | LT |
| Sprint | RT | RT |
| Move Player | L | L |
| Tactics & Mentality | DPad | DPad |
| Rush GK (Hold Down) | ||
| Sliding Tackle | ||
| Tackle/Push or Pull (when chasing) | ||
| Contain | ||
| Change Player | LB | LB |
| Teammate Contain | RB | RB |
| Jockey | LT | LT |
| Sprint | RT | RT |
| Move Player | L | L |
| Tactics & Mentality | DPad | DPad |
| Through Ball | A | A |
| Lob Pass/Cross/Header | S | S |
| Shoot/Volley/Header | LMB | RMB |
| Short Pass/Header | RMB | LMB |
| Player Run/Modifier | LSHIFT | LSHIFT |
| Finesse Shot Modifier | D | D |
| Protect Ball | Move Mouse | Move Mouse |
| Sprint | Move Mouse | Move Mouse |
| Move Player | Move Mouse | Move Mouse |
| Tactics & Mentality | Left Arrow | Left Arrow |
| Rush GK (Hold Down) | A | A |
| Sliding Tackle | S | S |
| Tackle / Push or Pull (when chasing) | LMB | RMB |
| Contain | RMB | LMB |
| Change Player | LSHIFT | LSHIFT |
| Teammate Contain | D | D |
| Jovkey | Move Mouse | Move Mouse |
| Sprint | Move Mouse | Move Mouse |
| Move Player | Move Mouse | Move Mouse |
| Tactics & Mentality | Left Arrow | Left Arrow |
If you need help to identify the buttons, click in your platform.
You can also check the complete and official list of controls.
You can also check the complete and official list of controls.